
Note – Information entered will typically stay after each search. Things like site(s), Employee, Excluded Days of Week to name a few. We recommend always double-checking information, especially if you are in membership/scheduling or a supervisor who looks at subordinates calendars.

If you are an Admin or a Super User for an organization, please check out the link below for the Time Blocked Reason History.
Employee Schedule Overview
1. Select the site(s). This will auto-populate to users assigned site(s).
2. Select the Employee(s). This will auto-populate to the user who is logged in. You can search an employee schedule by typing in first, last name, or full name.
3. Select the Specialties (this is not required to search for the calendar).
4. Select the days you would want to exclude from the calendar. AXIOM will default to Saturday and Sunday.
5. Select the Start Date to view. This will default to today’s date.
6. Click on Search Calendar when finished.
7. Site: Once you filter for yourself or an employee a calendar will open displaying the employee's schedule starting with each site.
8. Date: this will display the date you are looking at for the calendar.
9. The white blocks are open sections the employee has in their schedule that can be selected to add an appointment or time block. You can add Appointments via clicking on an open space or by navigating to the “Appointment” page via the form search or the left navigation menu.
10. This displays an appointment that was added to the employee schedule for the indicated time and site of where it is located.
11. Filter: You can filter the date by day, week or month. The arrows will take you to the next/previous aspect of how you have it filtered. (Day, week, month) You can also Show or hide cancelled appointments.
12. Change View: Allows you to view the Calendar in a different format (Same view as Patient Management and Quick Access). This will also allow you to view your calendar with your sites separately if you have more than one site.
Adding an Appointment or a Time Block
When you select a desired time and click, a pop-up will appear offering for you to create an Appointment or a Time Block. Select which you desire and follow the next steps in the following sections.
Adding Appointment in the Employee Schedule
1. You can add an appointment by clicking on a white empty box in the indicated time, site, and day needed. Once the popup appears select Appointment.
a. You will then have to select a patient via the Search Patient Box that appears.
b. Once you Search for the patient, you have to click(select) the desired patient.

Now that a patient is selected, the Appointment option page will populate. Bold titles of sections are required.
2. This area will display the patient information to which the appointment corresponds.
3. Staff Member: you can select the appropriate staff member and the appointment will be made from a drop-down menu.
4. Date: You can change the date needed for the appointment or leave default selected when clicking on the white box from the employee schedule.
5. Star Time: You can change the time for the appointment or leave the default selected when clicking on the white box from the employee schedule.
6. Duration: This drop-down menu allows you to choose the duration of the appointment.
7. Transportation: This drop-down menu allows you to select the appropriate transportation for the patient.
8. Appointment Site: You can change the site for the appointment or leave the default selected when clicking on the white box from the employee schedule.
9. Appointment Reason: This allows you to select the appointment reason.
10. Meeting type: This drop-down menu allows you to choose the meeting type of appointment. It is optional to enter the staff member’s email address.
11. Room Number: This allows you to select the appropriate room number of where thew appointment will take place if needed.
12. Comments: This section is a free text box that allows you to enter any comments related to the appointment being scheduled.
13. Frequency: This drop-down allows you to select the frequency of the appointment (daily, weekly, monthly, etc.).
a. End date: Select the desired end date of the appointment or leave the default selected.
14. Submit: This button will submit and schedule the appointment.
Adding a Time Block in the Employee Schedule
1. Staff Member: You can select from the drop-down menu the appropriate staff to which a time block will be added.
2. Date: This allows you to select the date for the time block.
3. Start and End time: This allows you to select the start and end time for a time block.
4. Reason: This drop-down menu allows you to select the reason for a time block.
5. Comment: This is a free text box that allows you to enter any information related to the time block being added.
6. Frequency: This allows you to create a time block frequency (more than one day) if required.
7. End Date: If the frequency will be more than once you can select the appropriate end date for that time to stop.
8. Submit, Reset, Hide: This allows you to Submit the time block for the employee or reset the data if a new one is needed. You can also hide the Time Block table.
Appointment by Site
Appointment by Site: This will show you appointments based on a selected site, for yourself or an employee you are scheduling for.
- Select the site, Date, and Employee the appointment is with. Click search to view results below.
Time Blocked History
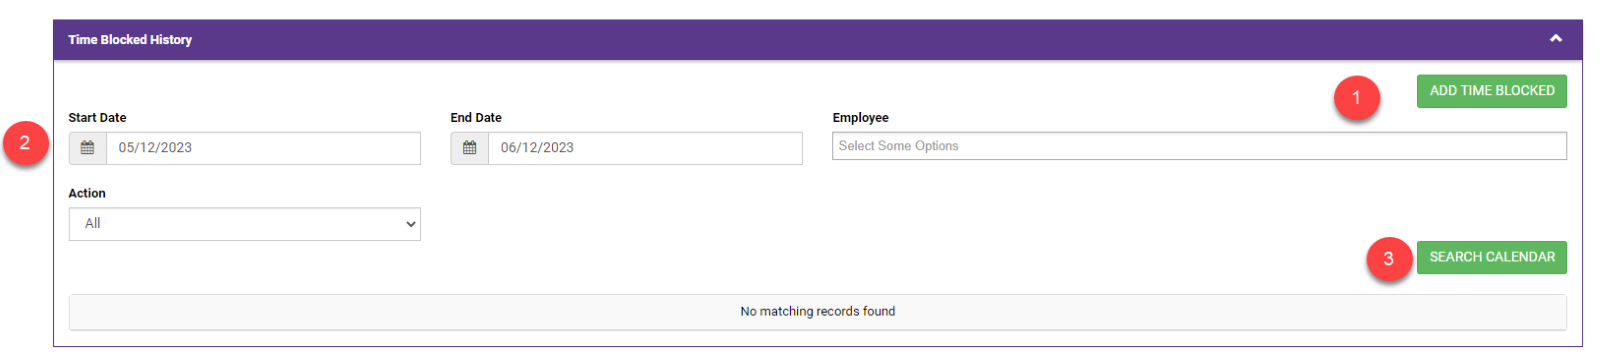
1. Add Time Blocked: This allows you to enter any new time blocks.
2. Start and End time: You can filter for time blocked by adding a start and end date.
a. Employee: This section allows you to enter the employee (most likely yourself) that needs to be searched for time blocks.
3. Search Calendar: Once fields are entered you can search for employee time blocks that were filtered by date.
CONFIDENTIAL AND PROPRIETARY INFORMATION - NOT FOR DISTRIBUTION Copyright © 2023 Health Information Management Systems, LLC